Tuesday, February 21, 2012

Upcycling, Repurposing and Inspirational Things

One of my favorite things is finding inspiration in the unusual. Upcycling has become a trendy, even stylish term lately, but repurposing interesting objects has been the hobby of many folks for a long time. 

When we first moved to Knoxville in 2000, Mr. Vagabond and I lived in an adorable little Barber Victorian cottage on the fringe of the historic Fourth & Gill community. Although I'd long been a fan of thrift (ok, junk) stores, I soon discovered that Knoxville took it to a whole new level compared to what I'd seen in other towns. One of the first things I started collecting here was dishes. I used some of them in my little garden.

Unfortunately, my Golden Retriever bit the heads off every petunia. 

That was a neat way to use broken dishes and teacups with crazing in the glaze. The bad parts of the plates were hidden in the dirt, and I broke out the bottoms of the teacups. 

I amassed stacks and stacks of creamy-white Homer Laughlin dinnerware. Some pieces were plain, and others had delicate, faded floral patterns. I considered them my fancy plates, and reserved them for special occasions. Some of the pieces have disappeared over the past 12 years, and that makes me sad. 

Anyway, back to repurposing. 

Every older man I know has several glass insulators in a box somewhere in his garage. I've always loved the look of them, but never knew what I could do with one. 

What about this?


Or this?


Beautiful, no? Clever, too. 

At one time, I could find glass insulators for nothing at local thrift stores. Now they are VERY pricey, as their value is becoming more and more apparent. Lucky me, I had some foresight and bought every one I could find back in the day. Now to bring out the diamond bit and my Rotozip!

Old glass bottles are another favorite of mine. I have loads of them. 

So what about something like this?


I've been buying old bottles for about as long as I can remember, too.

Another favorite thing is old doors. I love old doors. I have one leaning against the wall in my kitchen just waiting for new purpose. 

Maybe one of these ideas will work. 

I could use one of these in my foyer

My old door is just about this size.

Now, THIS is really cool!
 
One of the tricks to repurposing or upcycling, at least when it comes to interiors, is to make an item that is already attractive into something useful as well. An old thing on a shelf is just an old thing on a shelf. If it isn't beautiful in the first place, it probably won't stand on its own as art or an artistic furnishing.

An old bottle with bubbles in the glass is a thing of beauty just the way it is. An old door that is rugged and full of detail is lovely for its craftsmanship alone. 

When you choose an object to convert into something else, consider the object for its own sake, just as it is, before you think about what you could turn it into. That way, you're not adding decoration to something that's not really worth it. 

XOXO
Photobucket

Monday, February 13, 2012

Extracting an Interior Design Color Palette in Gimp

A few days ago, I learned how to create an interior design color palette from an image and I thought this info might be useful for others. How many times have you seen an image of a room and wished you knew the colors the decorator used? For me, the answer is lots.

And away we go.

I use photo manipulation / editing software called Gimp, which is very similar to Photoshop. The biggest difference is that Gimp is free. Free!  You can download it here

Open an image of a room that you love with Gimp. I fell for the colors in this one.

Cheery little space.
There are so many things to love about this room. The creamy white walls, aquamarine bench cushions, sandy-colored floor tiles, all punctuated with a soft yet bright yellow. And of course the cute pup!

You may not realize it, but oftentimes a room is appealing because of the overall presentation, and not just the main fixtures in the room. If you only pulled the colors of the walls, cabinets, floor, countertop and bench cushions, you wouldn't have all of the components that make this room a thing that resonates beauty. So yes, the colors should include the pup. :-)

In the upper toolbar of the image in Gimp, click on "Colors" then "Info" then "Smooth Palette." A new window will pop up that looks like this:


Each detectible color in the original image is arranged in neat columns for you view in an orderly fashion and select for your personal palette.

The next thing I do is create a new file. I usually make it 640 by 480 pixels. Click on the upper ruler and hold down the mouse button, then drag down into the body of the image. A line will come down from the bar and land wherever you release the mouse button. You can move it if you don't like the position. Repeat that step a few times to make horizontal dividers. I usually make three dividers, which gives me four spaces. Then repeat the whole thing from the left ruler to make vertical dividers. The rulers on the top and side will help you place the guides evenly.

Once the guidelines are set where you want them in the body of the blank image, use the square select tool in the upper left of the separate toolbar (where the paint brushes, bucket fill and other tools are located) to select one square of the grid. The guidelines in the image will act as a slight bumper to help prevent the drag from going past the lines and bleeding into the next section. You can drag the tool past the guides, but if you get close and release the mouse button, it will outline only the selected square. The highlighted square will flicker around the perimeter, showing you that it is selected.

Using the eyedropper tool, select a color in the striped palette that you like. Fill the selected square with color from the dropper tool using the paint bucket or a paint brush tool.

Fill each square with a different color that you like from the palette using the square select tool, eyedropper tool and paint bucket or paintbrush.

These are the colors I picked.


You probably don't want to create a grid that shows every single color in the image. That would be gigantic. I already have a pretty good idea of the wall color since I used a similar color in my downstairs bath, so I didn't think it was necessary to add it to this palette. But I especially wanted the yellows, aquas and greens. 

The main grid will not have the white dividers between the colors, but that's easy to add after you fill the squares. On the upper toolbar, click on "View" then "Show grid." A tight grid will appear, covering the whole image. Choose the square select tool again and select along two parallel grid lines between two colors, then fill the selection with white. Repeat at the edge of each square. 

Once you have one large palette, you can modify it very easily (and save it with a new filename) to make new palettes. The fuzzy select tool will capture one color at a time in the grid, which is easier than using the square select tool. Click on a colored square, select a color from a palette and replace the color in the fuzzy selected area with the new color. 

And there you have it. The next time you see a picture of a room that makes you go gaga, pull the colors you want to remember and make a palette to help you reproduce whichever elements of the room you like. 

XOXO

Photobucket

Saturday, February 11, 2012

Playing in Mud -- How to Mix Drywall Joint Compound

Today, boys and girls, we're going to play in mud. Drywall mud, that is. Mud is more fun to say than pre-mixed drywall joint compound, so I'll go with it.

Mud is usually a mixture of pulverized limestone, water and other additives. It is used to tape and finish seams between drywall panels, repair dings and holes, and smooth out wall irregularities. Many folks would scream at the idea, but I have used hot-mix mud to repair plaster with impressive results. But we're not talking about hot-mix today.

Sheetrock is one of several mud brands that I have used. 
Some folks think the words "ready-mixed" or "pre-mixed" mean the mud is ready to use straight out of the tub. Not so. Well, you can, but not if you want good results. Pre-mixed mud has been blended with water, but it's not smooth. If you want smooth, even walls, not to mention a lot fewer headaches, you have to mix pre-mixed mud.

When buying pre-mixed mud, opt for the heavier container. I know, I know. It weighs a lot more than lightweight joint compound. Lightweight mud is basically mud plus air. Do you really want to pay for air?

I thought not.

If the bucket is too heavy, the nice guys at Lowe's and Home Depot will load it into your buggy. They'll usually load it into your vehicle as well. At home, you're on your own.

A brand new bucket of mud comes out lumpy. Lumpy mud is hard to work with. Even the smallest lumps leave ridges across the wall when you spread it with a mud knife. You'll chase the lumps, work out ridges, get really tired, switch hands with the mud knife before carpal tunnel sets in, possibly say some bad words, introduce more lumps and ultimately cause… more ridges.

This is why we mix.

Unless you have arms like Paul Bunyan and are a glutton for hard labor, you need a mud- or paint-mixing tool.

The one I use looks like this.

Shiny!
Fasten the top of the rod to a power drill, and voila!  You've got a mud mixer. You can also use it to mix paint.

In addition to a mixing tool and a drill, you'll also need a clean, empty bucket with a secure lid.

Scoop out about half the mud from the new container, put it into the clean bucket and seal the bucket. Mud is very stiff at first, so use a sturdy scoop. I use a large dog food scooper. Many folks scoop out mud with a mud knife, but that is a bit difficult for me. Plus, a plastic scooper is easy to rinse out and can't rust. Rusty mud knives are a pain in the rear.

Don't use it to scoop pet food after using it with mud.

When you open a new bucket of mud, there's a little plastic film covering the top. Save it.

Pour about a cup of water into the open bucket and get ready to mix.


This is the fun part.
Brace the bucket between your feet, and hold on tight. If you can't do that, ask someone to hold the bucket while you mix. Turn on the drill and slowly push the mixer into the mud a little at a time. If you push the mixer into the mud before you turn on the drill, you won't be happy. The bucket might spin, the drill might fly out of your hands or you may just dislocate your shoulder. If the planets are properly aligned, you might even accomplish all three at once!

That's not a good thing.

Well-mixed mud is the consistency of cake frosting. It should not drip off the mixer. If it's too thin, add some unmixed mud from the other bucket.
Use low speed and high torque at first. Raise and lower the mixer through the mud, scrape the sides of the bucket and blend it until all the lumps are worked out. Increase the speed of the drill as the mud gets smoother. If it's still too thick, mix in a little more water. When it's fully blended, raise the mixer out of the mud and spin off the excess inside the bucket.

If you're like me, you'll set the mixer on the floor and let it dry before cleaning off the mud. You should rinse it off while it's still wet, but I am always too anxious to get on with the mudding part.

You can use the mud right away or close up the bucket and save it. Scrape off the excess mud on the sides of the bucket, put the plastic film on top of the mud and seal the bucket.

If you leave mixed mud too long, you'll need to add a little more water and blend it again.

And that's how you mix pre-mixed mud. It's scary how much fun DIY home improvement can be.

Or maybe I just need therapy.

**Drywall joint compound is not the same as spackle. Spackle performs very well for filling and patching tiny nail holes, but you'll hate yourself in the morning if you try to use it on a large area. It dries exceptionally hard and is difficult to sand, it won't hold seam tape properly, and it's fluffy and filled with trillions of air bubbles.


XOXO
  Photobucket

Friday, February 10, 2012

Sad Buried Treasure in a Victorian Bedroom

People like me, who live for restoring and cautiously updating old houses, also live for the hidden treasure. Treasure found inside old houses is usually devoid of any monetary value, but the sentimental value can be off the charts. Recently, while uncovering an old, hidden closet in my bedroom, Mr. Vagabond and I discovered something we truly didn't expect.


But lets begin at the beginning.


My bedroom was once covered in 70s paneling. Ugh. The original plaster walls were assaulted by furring strips which were used to hold the paneling nails. In my mind, repairing the plaster is much easier than installing paneling, but what do I know? The result of the odious paneling was this:


Don't get me started on that ceiling.
While Mr. Vagabond was out of town for a couple weeks, I took it upon my self to rip out the paneling. That was fun, especially the part where I opened the bedroom window and slid the panels down the old metal roof over the kitchen and into the backyard. When Mr. Vagabond returned home, he was not amused. You see, in his mind paneling was at least a finished wall. In my mind, it was offensive and had to go. 


For the next two years, we lived with really ugly plaster walls that were in serious disrepair. So maybe he was right about having finished walls. He can be right one time. Pfft. 


Because the bedroom isn't a place where we invite our neighbors, it's also low in terms of critical finishing needs. Several months ago, we decided to finally uncover the old closet that was boarded up and convert it into a book case. The things inside would blow your mind. These people actually walled over medicine bottles, shoes and a pair of little boys underwear (WORN!). Ahhh, the treasure in an old house. I do not have photographic proof. You'll have to take my word for it. 


So anyway, on we went with gutting the closet. 


We stuck foam board against the exterior wall until we put insulation inside. Also, why is one of my baseboards and a bed frame in there? The world may never know. 


In the wall to the right of the closet, we succumbed to the pressure of drywall. I know, I know. But desperate times called for desperate measures. In other words, the plaster on that wall had fairly turned to sand. It was bad. Really bad. I can repair most any plaster that is still somewhat sound, but I was not prepared to tackle replastering a whole wall in the middle of March.


One very interesting thing I noticed after unboarding the closet was the 2-by-4 they installed as a brace. I guess measuring tapes were too much to deal with since it was approximately 1 inch too long for the space. It bowed out and curved to the right. :facepalm:  At least the header was in no danger of falling! 


I'm getting to the treasure part. 


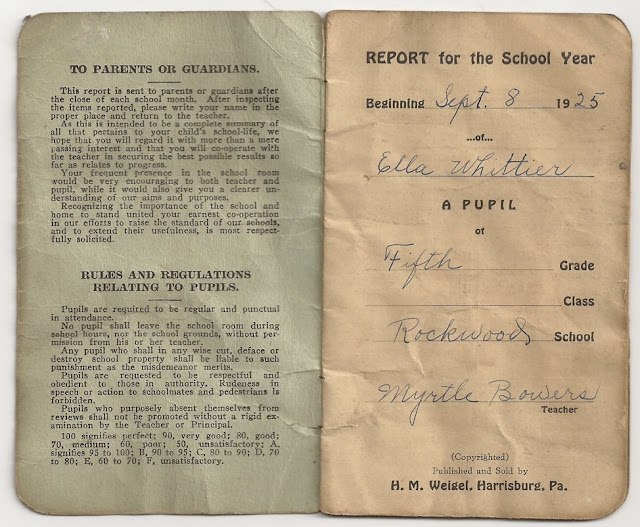
The day we worked on this closet, the whole room was filled with old soot from the fireplace that was long since removed and what seemed like 100 years of dust, dirt and old crumbling wallpaper. While sweeping up, I looked down at my feet and saw something strange. It was a small book. I asked Mr. Vagabond if he'd noticed it before, but he hadn't. 


This book seemingly materialized dead center in the pile of dust, dirt and wallpaper. 
Initially, the book was almost black. I carefully dusted it off to read the cover.
Scholar's Monthly Reports. Neato!


I remember those things from back in the long ago before today's report cards. I quickly opened it. 


Ella Whittier!  We have a name! 1925. Amazing.
The remaining pages showed me that little Ella was perhaps more focused on other things besides silly old schooling.


Sewell Whittier must have been little Ella's father
Alas, little Ella was retained in the fifth grade.
Finding this book sparked my curiosity, of course. I've got mad research skills, so I put them to work and turned up some interesting facts.


The first bit of information is difficult and sad. 


I lifted this from the October 7, 1926 edition of the Rockwood Times:


_____________


October 7, 1926
THIRTEEN BODIES REMOVED FROM MINE

SEWELL WHITTIER FOUND BEHIND PILE OF COAL ------------------- Many Funerals Yesterday and Today 14 Bodies Remain in Entry Fire Not Encountered --------------------
The body of S.P. Whittier was found this morning about 10:00 o'clock by helmet men behind a pile of coal in his room off Rodgers entry and was brought to the surface at 2:00 this afternoon. A search of Whittier's place last night failed to disclose the body, which was entirely concealed and which was finally traced from its odor. It is said that the body was not badly torn or mangled. --------------------

_____________


Chills ran through me, as they do again while I write this. Little Ella's father was killed in a mine explosion only months after he signed her Scholar Report for the last time. 


More research revealed that Mr. Whittier left behind a wife and six children. 


But the sun does come out, even on sad revelations. Even more research (I told you I am a research whiz) uncovered more information about Miss Ella. 


I found this at a local mortuary:
________________


Mrs. Ola “Punkin” Rowley, age 68 of Walnut Street, Spring City passed away Wednesday, July 8, 2009 at Baptist West Hospital in Knoxville.  Mrs. Rowley, who was of the Baptist faith, was born April 21, 1941 in Rockwood to Arnold Franklin & Ella Katherine Whittier Gibson.  Besides her parents she was preceded in death by a sister, Ruby Sexton Gaylardo; and a brother, Jack J. Gibson. 
______________


Miss Ella went on to apparently have a very full life. She was married to Arnold Franklin, had seven children (according to Ola's funeral notice), and several grandchildren. I haven't dug any more to learn about other relatives.


Reading Ola's funeral notice really put the time thing into perspective. Ella's school report was dated 1925, and she was in fifth grade. Her daughter died in 2009 at the age of 68.


Each time I hear some strange noise in the house, I wonder if Sewell is rustling about. He was clearly gone before his time. Lots of folks talk about disrupting or unsettling spirits when an old house is undergoing renovations. If that is true, and if Sewell does stop by occasionally, I can only think that he's happy with what we're doing. 


Who knows what will turn up in the rest of the house. I did find a little hidden floor panel / trap door in one of the bedrooms...

Thursday, February 9, 2012

In Search of Historically-Accurate Victorian Paint

Winter is breaking, the heat is being used less and less, and my tulips are poking up through the ground. Each time the warm sunshine finds its way through February clouds and streams through the windows of my 1890 folk Victorian home, I am reminded of how badly this house needs new siding and a nice coat of paint. The trouble is finding the right siding and the right paint.

Pinterest is one of my favorite new time suckers. I justify the hours I spend pinning, repinning and scrolling through everyone else's pins by telling myself that it's a valuable source of inspiration and information. The first of those two points is true. 

Sorting through what seemed to be miles of pins this morning, I learned that while Pinterest is certainly a terrific way to share inspiration, it's also a fast and furious way to spread misinformation. Victorian homes are a good example. 

Pin after pin, I saw Craftsman homes misidentified as Victorians, vivid tangerine paint described as period-accurate for the 1800s and white paint frowned upon as safe, boring, meek and only selected by homeowners who lack the courage to go with an "authentic" Painted Lady look. 

Fact is, many of the wild colors seen on Painted Lady houses are not only hard to look at, they're flat wrong for the period. I challenge anyone to show me a home that was originally painted in a combination of neon orange, turquoise, fuchsia and lime. Gaudy? Yep. Blinding? You bet. Garish? Well, you get the idea. 

Accurate?  Probably not.

I don't claim to know everything there is to know about historically accurate paint colors, but I do know a few things, and I am always greedy to learn more. 

Many of the colors originally used on Victorians were, indeed, contrasting combinations that highlighted fancy architectural details. But to my knowledge, those colors weren't day-glow pink and turquoise. Muddied reds, browns and golds are a more likely combination than pretty-pretty pastels.

And white is also accurate for some homes, so there!

White is the direction I am leaning for my house. Safe? Of course. But it is also quite accurate for the age and style of my home. The original cedar siding that's hidden under layers of horrifying remuddling attempts is unpainted. While I love the look of cedar, I also think it's a bit dark for this house. 

For those of you playing along at home, you may remember what my house looked like when we bought it. If not, here's a reminder. 

Do I really need another caption about how sad my house looked back then?


When I think about the way I want her to look (eventually), I picture something more like this.

Pay no attention to the crooked siding and windows. My Gimp photo manipulation skills are still in the embryotic stage.
To me, white paint is clean, fresh, bright and tidy. Narrower siding than what's on the house at the moment is correct for the period, and those hideous plastic shutters in the first image are already long gone. 

Dressier porch columns and balusters are in order, and I really want to splurge on copper gutters and downspouts. I also hope to restore the transom over the front door. Maybe I'll add a bit of stained glass there. It wouldn't be too expensive for such a small window. 

Some Folk Victorians originally had fancy trim, which is often called "gingerbread." I don't know if my house was adorned with it, but I did unearth an interesting attic vent cover with what appeared to be tulips carved into the wood. I found it in the attic looking tattered, worn, broken and, well, like this.

I'd love to know what the whole design looked like. The panel is broken, so it's anyone's guess. 
So we have part of a theme, and an idea that there was once a lot more to this house than plain cedar siding. 

If those are, indeed, tulips, maybe the stained glass for the transom could mimic it in something like this.


Or this.


Or this.


You get the idea.

With all of the ideas flying around about what defines a Victorian, I'm trying to stay true to what is realistic for mine. Painted Ladies in San Francisco can get away with outlandish color combinations. My little folk Victorian is situated at the top of a hill in rural east Tennessee. It's more of a farmhouse than anything. 

So white it is. Now to get the new siding and get her painted.